Showing posts with label Android. Show all posts

Connect PS3 Controller to Android phone or Tablet

4 comments
Playing games on Android phones and tablets are fun. A time has come where Tablets can beat Consoles when it comes to Gaming. I remember the time when the biggest games on PC were GTA 3 and Max Payne 2. Rockstar Games has done a wonderful job in releasing those games to mobile platforms like Android and iOS. But one of the main reasons that keeps the mobile platform one step behind gaming consoles is the poor game controls. One can't replace a keyboard or a gaming controller with a touch screen! Using touch screen for gaming is not not ergonomic while playing for hours because you need the whole tablet or phone in hand to play the game. Also it can't provide vibration feedback, precision, comfort etc. As of now we can't use a full PC keyboard and Mouse on Android phones or tablets but some like the Asus Transformer has an optional keyboard but, we can use the PS3 Sixaxis Controller to Android. 


Play games android PS3 controller
Sixaxis Controller by Dancing Pixel Studios is an app for android which lets you connect PS3 Bluetooth controller to your phone or tablet easily. The app has tons of features. You can use upto 4  four Sixaxis and DualShock 3 controllers at once. You can use all buttons including the Analog sticks. Supports Keyboard emulation and Mouse emulation as well. 

The app is a paid and not all devices supports it. You should first download the Sixaxis Compatibility Checker app before you should buy the paid app. Your device should be rooted as well. Here are the links to the official instructions on how to proceed and the link to the app.


Optimize WiFi on Android with Better WiFi on/off App

0 comments
Better WiFi On/Off is an Android application which lets you manage Wifi on your phone by a set of rules. If you haven't noticed before, WiFi is something which drains your battery very quick. Some might claim that WiFi draws less 3G but optimizing WiFi with this app can save even more of your battery life when you are on the go. WiFi On/Off is currently in the Beta stages and there are some bugs which you can live with! This app is free of cost and is ad supported and a paid app for supporting the devs will be released as soon as the app comes out of beta stages. So how does this application lets you save your battery life? 

Better WiFi on Android


This app turns on WiFi when the screen is turned/unlocked and when the device is connected to AC source and switching off WiFi when not in use. Pretty neat, right? You can just lock the screen and WiFi will be turned off instantly. But if you are downloading something, it might use the 3G and might cost you according to your data plan provided by your carrier. So i suggest not using this app while downloading or connect to an AC charger instead. 

Here are some of the features which will be implemented soon according to the developer. Location based rules, Time based rules, Checking of a Internet connection etc. You can also request for more features on the official thread posted after the break. Credits to chamonics, Recognized Dev XDA


Install MIUI on Samsung Galaxy S3

0 comments
The MIUI ROMs have always provided stunning visuals. The only drawback was that most phones did not get the official ROM and only buggy versions made by other developers where available. But the MIUI developers keeping true to their tradition of making ROMs for the Galaxy phones have also released the MIUI ROM for Samsung's flagship model the Galaxy S3. It is a bit disappointing that this ROM is based on Android ICS 4.0.3 and not Jellybean but then again the official Jellybean update for the S3 has not yet even been released so maybe we can expect a Jellybean ROM later this year. This ROM is only available to be installed on I9300 version and not any other variants of the S3. Without further talking about the ROM let us get to the installation process.
Before beginning make sure you back up your data because in the process you will need to wipe your data from phone memory but not SD Card. If you are not familiar with changing ROMs and stuff please make sure you back up everything on the phone that you will need. For example make sure you have back up of your Network Connection settings to make sure you don't loose access to the internet after installing this ROM on your device.


Before proceeding know that although this ROM is working an tested, it is possible to do some damage to your device. Unlimited Tips is not forcing you to install the ROM and we can't help you if you damage your phone.


Installing MIUI ROM

  1. First make sure you have Clockwork Mod Recovery Installed if you don't head on down to the link and install it.
  2. Now download the MIUI ROM from here.
  3. Now plug in your phone and copy the downloaded .zip file to the internal SD card. Now unplug it and boot into recovery mode. In case you don't know how to do that all you have to do is press the Volume Up, Home and Power Buttons together and hold till the screen goes and comes back on again.
  4. Now select wipe data and confirm it. Then select install zip from SD card and select the zip you copied earlier. To navigate use the Volume keys and Home Button.
  5. Now just wait for the installation to finish and then reboot, that's it.
Congratulations on installing the MIUI ROM on your S3. If you have any doubts about the procedure just drop a comment below.

Send Ayush Chand+ an email.

Pico tts Alternative for Android

0 comments
As you all know Android comes with Pico text to speech application as default. It's robotic like and boring speech is something I was worried about. Pico can be used to change text directly into speech as well as used in various applications like IRIS, the popular siri replacement for Android. If the default android voice is what you are looking to change, I have a good replacement for you.


Android pico tts replacement


Ivona is a High quality tts which makes you think that you are talking to a real person inside your phone. It is so life like that you will forget about Pico. Ivona is high quality, human speech like and available in different accents as well as different languages. Currently it is in the beta stages but sure it can be used. It makes voice activated apps so much better and fun to use. 


IVONA will read aloud on your Android:
* directions while driving with Google Navigation;
* e-books with apps like Book Speech and ReadBoox;
* SMS messages for safe driving with Handcent SMS, Drive Carefully, etc.;
* social news feeds like Facebook and Twitter with iHear Network;
* system menu with Spiel;
* and many other speech-enabled applications.


After Ivona is installed on your phone, you can select from variety of languages for your phone. The size is about 300MB. When the downloading is finished, go to settings and change the default pico tts to Ivona. Enjoy!


Download IVONA tts

How to Unroot Samsung Galaxy S3

0 comments
Samsung Galaxy S3 I9300 was released hardly a month ago and developers have already managed to acquire a root. Samsung Galaxy S3 has a powerful Quad-core 1.4 GHz Cortex-A9, a 8MP camera capable of only 720p recording,  4.8 inch super AMOLED screen at 720 x 1280 resolution, 1GB of RAM and comes with Android Icecream Sandwich out of the box. In other words, the Samsung Galaxy S3 is one of the most powerful Android phone you can get in the market.
unrooting Samsung


 We recently posted how to root samsung galaxy s3. Here is the how to unroot it. Make sure you make a back up before doing this or else you will lose all your important data.


How to Unroot Samsung Galaxy S3 I9300


[Video Guide at bottom]

1. Install Samsung Kies if not already installed.

2. Go to Download mode by turning off the phone and then pressing Volume down+ Home button and then the power button.

3.See if "Custom Binary Download" is "NO", if "YES" then proceed to step 5 if it says 1 count or something like that then go to next step.

4. Go to this link and reset the binary counters. After resetting go back to download mode again. [Video at bottom]

5. You need the latest Galaxy S3 firmwares to flash it. Download it from here.

6. Extract the zip file to a safe location.

7. Download Odin 1.85 from here and run it.

8. Now connect your Galaxy S3 to your PC via USB cable. Odin should detect your phone and give a green light and you will see "Added" at the status box.

9. Click PDA and select .tar.md5 from the zip you extracted before.

10. Auto Reboot and F Reset Time are selected as default, dont change anything or you will end up bricking your phone.

11. Click Start and wait for Odin to display "PASS!" in green. Meanwhile don't do anything even if Odin is not responding.

12. Go to recovery mode by switching off the phone and then Volume Up+ Home and power button.

13. Use volume buttons to navigate and power button to select. Do a factory wipe, wipe cache and then do a reboot.

14. Check for the Super User App and if it's missing you have successfully unrooted your Galaxy S3.

Video Guide.


Thanks XDA

Install CM9/Cyanogenmod 9 on Samsung Galaxy S3

1 comments
The Samsung Galaxy S3 was rooted much before its release and now one of the most famous ROMs for Android Devices CyanogenMod 9 is now available to be installed on the Samsung Galaxy S3. The Cyanogenmod 9 available right now is still only a nightly version and at the time of putting this post only the first nightly is available to be installed. It is not exactly perfect as it has minor problems such as having problems with the FM Radio and Flash in Camera. But besides that it is working well and we can expect a Stable version of CM9 for the S3 soon. To install CM9 on your S3 you will need to root your device. You may be thinking that rooting will void your warranty and won't it cause a lot of problems. You can always just unroot your phone and get back the warranty. Anyway without further delay let us get into installing CM9 on the Galaxy S3.


From the above screenshot you can see that the CM9 available is on ICS 4.0.4 is not a stable version. 


To install CM9 you will need to :

  • Root the Samsung Galaxy S3. If you haven't already done it just root the galaxy s3 from the link mentioned.
  • After you have done that head on down to these links and download the necessary files for this installation.
    CM9
    Google Apps
  • Now after downloading the files for the setup just copy them onto your S3's internal SD card. After that reboot your device into recovery mode. To do that hold Volume Up, Home and Power Buttons simultaneously.
  • Now you just navigate using the volume keys and flash the 2 .zip files you copied in step 3. After that make sure you wipe data or do a factory reset, just to prevent a minor error. Now just reboot your phone and that's it.
Now you have successfully installed CM9 on Samsung Flagship device. If you have any doubts about the installation or are experiencing any errors feel free to comment below.


Send Ayush Chand+ an email.

How To Root Sony Xperia Sola

2 comments
The Sony Xperia Sola can now be rooted thanks to DoomLoRD. The rooted kernel easily be installed on a device in which Bootloader is unlocked. The Xperia Sola once rooted can be installed with custom ROMs. The ROMs on the Xperia Sola are still only Android Gingerbread 2.3.7 supported so its not much of a difference but we can expect a few ICS ROMs to be released by developers soon. The Sola like other devices of the recently launched Sony Android Smart-phones comes with floating touch and other features such as having the Bravia Engine. Anyway without further talk about the phone let us get to the rooting of the Xperia Sola.


As per DoomLoRD the features of the rooted kernel are given below.

  • [v01 onwards] added support for init.d scripts (/system/etc/init.d)
  • [v01 onwards] added support for userinit scripts:
    • if sd-ext is mounted then it will execute /sd-ext/userinit.sh & shell scripts in /sd-ext/userinit.d/ folder
    • also scripts in /data/local/ will be executed... it will execute /data/local/userinit.sh & shell scripts in /data/local/userinit.d/ folder
  • [v01 onwards] autorooting (prerooted)
    • su binary & superuser.apk will automatically be installed by kernel 
    • busybox (1.18.4) gets installed at /system/xbin/
  • [v01 onwards] insecure ramdisk
    • ramdisk is insecure (ro.secure=0)
    • adb server is persistent
    • usb debugging enabled
    • rootfs and /system mounted as rw

Before we can root the Sola we need to first unlock its Bootloader. This is a bit of a long process and needs to be followed precisely.


  • Unlocking the Sony Xperia Sola is the lengthy process compared to rooting the phone. Anyway to begin first find out your IMEI No. If you do not know already then just dial  *#06#. After you note this down you need to check if your phone can be unlocked. For this dial#*#7378423#*# and then go to Service Info, Configuration and then Rooting Status. If its says Yes then you can continue with the tutorial.
  • It is recommended to update drivers on your Xperia Sola so download this file. Plug in your Phone and then hold Power Down and Volume Up Key together to enter into FastBoot mode. By AutoRun the installation of Drivers will begin and then just make sure the installation of drivers is to  usb_driver. After the installation you can unplug your phone.
  • Visit this webpage. Scroll down and Hit Continue and Agree to Questions asked such as Are You Sure?. Then "read" the Legal Conditions and Accept it.  Next you will reach the Create Unlock Request Page. Then enter the Info requested by the page and you will receive a unique Unlock Code. Note it down.
  • From the extracted downloads of Step 2 open the Fast Boot Folder. Hold Shift Key and right click to get Shortcut Menu with Open Command Prompt Here Option. Click it. Now that you have Command Prompt Open plug in yur phone in FastBoot mode just as in step 2 then in Command Prompt type  fastboot.exe -i 0x0fce getvar version . After wait and see if 0.5 is returned. If it is it means that your phone is properly connected after that type in  fastboot.exe -i 0x0fce oem unlock 0xKEY replaceing KEY with the nique Key you got for Unlocking. After that your phone is Unlocked.

  • Now we can begin the rooting process.

    • Download the necessary rooted kernel from the link mentioned. Once you download the file boot your phone into fastboot mode and plug it to your PC.
    • Then Run Command Prompt in the folder type in the command
      fastboot flash boot kernel.elf
    That's it. Once you it finishes you have successfully rooted your Sony Xperia Sola. If you have any doubts about the process feel free to just comment below and I will get back to you.


    Send Ayush Chand+ an email.

    Samsung Galaxy Note 2 Specifications

    0 comments
    Recently some shots of the so-called Samsung Galaxy Note 2 has surfaced on the internet and here are what we have gathered about the new device. The Samsung Galaxy Note 2 is supposed to release in October 2012. The specifications of the Galaxy Note 2 are still only speculations but there are a few things we can be sure about. Samsung may be planning for domination in the smartphone market well at least the Android smartphone market with the Note 2 and the S III. The operating system will probably be Ice Cream Sandwich but if the Android fifth anniversary Nexus Devices some out before it we can expect Jelly Bean to be the operating system on the Galaxy Note 2.


    Galaxy Note not Note 2.
    As per leaked information the Note 2 should be having 2 GB or 1.5 GB RAM a Exynos 5250 chipset and a dual core processor, no quad core like the S III. It's screen is 0.2" larger than the note that is it has a 5.5" screen which is not really much of a difference and also it has a screen resolution of 1680x1050px.


    The processor is believed to be a ARM-15 processor and the phone comes with 4G connectivity. When more information is available we will post it. But at the moment this is all that is available on the Galaxy Note 2.

    How To Root Samsung Galaxy S3 I9300

    1 comments
    This tutorial explains How to Root the Samsung Galaxy S3 I9300.Yesterday Chainfire said that he had successfully rooted the Samsung Galaxy S3 I9300 remotely but could not release the insecure kernel to the public as it might be traced back to the person who leaked it. But now the insecure kernel is out and so here is how you can root the Samsung Galaxy S3. This rooting process is done on the XXALE8 firmware and the firmware can be installed on other phones also. The rooting process is not complicated or in any way much different from rooting other phones so I guess Samsung is still happy with allowing its users to have lot of access to the firmware.
    To root the Galaxy S3 I9300 just follow the below instructions.

    • First download the necessary files for the process such as the insecure kernel, ODIN and also the .bat file for installing SuperSU from the below links.
      Insecure Kernel
      ODIN
      SuperSU Setup
    • Extract the ODIN downloaded and run it. Switch off the Galaxy S3 and then enter into Download Mode by pressing the Power Volume Down and Home Buttons. Now plug it into your PC.
    • Now click on PDA and select the .tar file available in the Insecure Kernel zip. Now click OK once a section of ODIN turns Yellow.
    • Now once the process is complete unplug your phone and then go to Settings then Applications then Development then Enable USB Debugging. Now plug the phone back to the PC in Download Mode again and run the .bat file in SuperSU Setup download zip to finish the rooting process and gain Root Access. Now your phone should just reboot and that it.
    You have now successfully rooted the Samsung Galaxy S3 I9300. There maybe slight variations of the firmware on different models of the phone but it should work with minor changes.

    Send Ayush Chand+ an email.

    Download S-Voice APK for Android

    1 comments
    The Samsung Galaxy S III's exclusive S-Voice app is now available for everyone to use. The S-Voice app is not really anything like Siri and at the same time a lot like Siri. What I mean is that although it does have most of the functionality as Siri and does searches and stuff using Wolfram like Siri it does not really have the attitude and preset responses or even basic responses like Siri does. It does get repetitive when you ask questions that are not within the functionality of S-Voice. But it is still the best Voice Command accepting app for Android. Currently the app only works on ICS Devices and I do not think an all version supported S-Voice app will be out any time as most high performance smartphone can be installed in Android Ice Cream Sandwich.


    The ported one probably just an export of the S-Voice APK using Air Droid is now available and installing it is just like installing any third party application. Of course this is the real deal it is just that the APK is a ported one and cannot be downloaded off Play Store. To install S-Voice follow the instructions below.

    • Download S-Voice APK as a zip file from the link. Once you have it extract it to your ICS device SD Card.
    • You need to make sure that installing of third party applications has been allowed. To make sure it is just head on down to Settings and then Applications then Unknown Sources.
    • Now manually just browse to the location in your phone and select the APK. Now just follow the installation wizard to complete the installation process.
    That's it. Now you have successfully installed S-Voice on your Android ICS Device. For more such useful Download tips subscribe to our RSS Feed or Add me to your circles on Google +.


    Send Ayush Chand+ an email.

    Root Samsung Galaxy S III Acheived

    0 comments
    A elite recognized developer Chainfire at XDA has remotely found out how to root the Samsung Galaxy S III. As per the developer rooting the Samsung Galaxy S III is not that difficult and rooting it is just like any other Android phone and it can be done by a skilled programmer in a few minutes. The rooted kernel is not out at the moment because it might out the person who leaked the kernel at risk but once the phone is out in the hands of a developer after the official release or once an untraceable kernel is available the rooted kernel will be available for public access.
    Once the kernel is out to the public we will surely put the tutorial on how you can Root the Galaxy S III. Here are some screenshots of how chainfire achieved the root on the Samsung Galaxy S III.


    Until the kernel is released there is nothing that we can do but surely the rooting process will be available immediately after a safe way to release it is found.

    Send Ayush Chand+ an email.

    Install MIUI v2.3.7 on Samsung Galaxy Y

    3 comments
    Samsung Galaxy Y is one of the cheapest Android phones out in the market with a 826 MHz processor. XDA's senior member sgy.creed has managed to port MIUI rom to Samsung Galaxy Y. However this version is not originally meant for Galaxy Y. But testers and developers can take a look at this beautiful ROM. Please don't try this if you are new to  Android and haven't heard of the terms that are used in this post. This version is currently under development and we are not responsible for any damage caused to your phone.


    MIUI dev onlyMIUI for galaxy Y

    Here is how to Install MIUI ROM on Galaxy Y


    1. Download the zip file from here.
    2. Copy the zip file to the root folder of your phone.
    3. Install Clockwork Mod Recovery (CMW) if you haven't installed it before. You can find details on how to install it from this post.
    4. Reboot into CMW.
    5. Select the zip file which you have copied to the root of your device. Use Volume button to navigate in CMW.
    6. Install the file and you are done.
    7. If the ROM is too buggy for you, then you can try the patch here.

    For further information regarding bug fixes and further development please view the thread at XDA from here.

    Watch Samsung Galaxy S III Unpacked Live Stream

    1 comments
    The hottest smart phone launch of the season the Galaxy S III or the Next Galaxy is set to be released tonight and here are a couple of ways you can watch it online. The Unpacked event is available to be watched online in a few links including the stream by Samsung. Also Engadget and the Verge are also providing live streams of the event along with their teams their to make sure that Android fans everywhere do not miss out on anything that is part of the event. 


    Here is a teaser trailer released by Samsung some time ago on the Galaxy S III for its fans and followers.


    Without keeping you waiting any longer you can watch the event at the following links.


    The NEXT GALAXY site has a live stream


    Engadget and The Verge provides live streams also.


    Send Ayush Chand+ an email.


    Download Google Drive APK For Android

    1 comments
    Google latest project is Google Drive and as all other Google start-ups is currently being thought of by many as a Drop Box or Sky Drive killer. We will probably have to wait for some time to find out if Google Drive succeeds or fails terribly like Schemer or Google Wave or some might even say Google Plus. But we cannot really take Google Drive as just a copy of the existing services. It does come with many features. It includes a viewer which can actually allow to view files such as .psd and .ai files on the browser. Also it comes with ability to integrate Chrome Apps which can provide a lot more functionality. And what is a Google Service without it being fully functional on the Android OS. So even an app is available for it even though the service is not yet open to the general public.


    Google Drive by default offers 5 GB of space but they do provide the option to purchase further space. Also there might be ways to get more space through referrals or something but I do not think it is all that likely. Below is the pricing of the space as per Google.


    You can download the Google Drive App from Google Play from here. You can download Google Drive APK from the link.

    Send Ayush Chand+ an email.


    Install Gamerz ROM on Samsung Galaxy S I9000

    0 comments
    The latest Gamerz ROM v10 can be installed on the Samsung Galaxy S. You can install the Custom ROM which is on Android ICS 4.0.4 on any rooted Galaxy S. The Gamerz ROM according to many users is one of the best available Custom ROM on the Galaxy S. If you are not happy with your current ROM then I suggest you check this ROM out. The Gamerz ROM brings a great ICS interface along with a bug free (according to the developer) environment on the Galaxy S. Of course you will need to root your Galaxy S in order to install the ROM but of course you can just unroot it to get back the warranty.


    1. First thing you need to do is Root your Samsung Galaxy S for the installation of the custom ROM. Before doing that make sure you have USB Debugging Enabled. If you don't know how to do it then Go to Settings then Applications then Development then Enable USB Debugging.
    2. For the rest of the Rooting process follow these instructions. After you have installed and rooted your Samsung Galaxy S with the new firmware you can install the Custom ROM.
    3. Download the Gamerz ROM Firmware from the link.
    4. After you download that copy it on to your SD Card and then Switch Off your phone.
    5. Now you need to boot into Recovery Mode for that Hold the Volume Up, Home and Power Button simultaneously. Now that you have entered Recovery Mode you need to first Wipe the Data and the Cache. After that just go to Install Zip from SD Card. You can navigate using the Volume Keys and select the ROM that you copied in step 4 and Select it.
    6. Now just wait for the installation to finish. It should take about 5-10 Minutes. After that just Reboot to finish the installation and get your device ready for usage.
    That's it. Now you have installed Gamerz ROM ICS 4.0.4 on your Samsung Galaxy S. If you have any doubts in the process or if you are facing any difficulties in it then feel free to comment.

    Send Ayush Chand+ an email.

    Install CyanogenMod 9 (CM9) on Samsung Galaxy Y S5360

    24 comments

    Finally the Android 4.0.4 ICS CyanogenMod 9 has been made available. The ROM has been ported from the CyanogenMod 9 / CM9 on the Samsung Galaxy Mini which was released a while ago. The Cyanogen Mod 9 for Galaxy Y or Galaxy Young S5360 is a ported version but without any significant bugs according to the developer. The CM 9 ROM requires a rooted Samsung Galaxy Y. You can just as easily unroot from here.


    1. First thing you need to do is install the necessary modifications to your device to install CM9. For that head on down to this page and complete the tutorial up to the installation of CM7. Now you can install CM9.
    2. Installing CM9 is also just a matter of flashing the ROM which can be downloaded from here.
    In case you have little to know experience flashing a ROM on to a device here is quick tutorial.

    Download the *****.zip to flash.


    No need to extract. Copy the zip file to the root of the SD Card and do not paste it to any folders in the SD Card.


    Now switch off your phone


    After the phone is switched off, enter into recovery mode. To do this, hold the power, volume up and the home button simultaneously.


    Now can navigate through recovery mode only with the volume up and down buttons. Select *****.zip and wait for update to finish.
    That's it. Now you have successfully installed CyanogenMod 9 or CM9 on the Galaxy Y. Alternatively you can try out these ICS ROMs for the Galaxy Y.


    Send Ayush Chand+ an email.

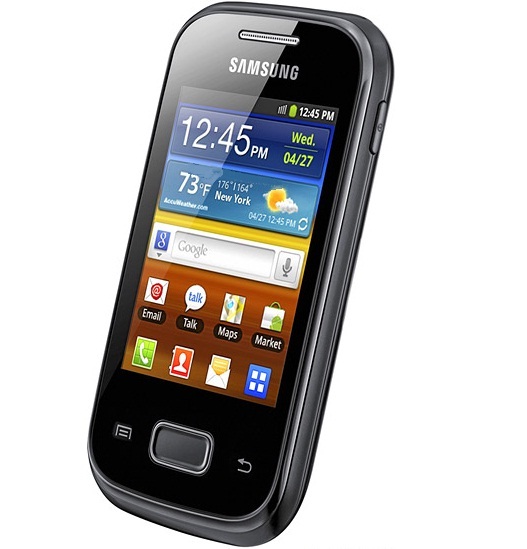
    Samsung Galaxy Pocket S5300 Review and Specifications

    1 comments
    The Samsung Galaxy Pocket is a more expensive version of the Samsung Galaxy Y S5360 as it has almost identical features with a couple of changes. This is a review of the Samsung Galaxy Pocket but it is also a comparison between the Galaxy Pocket and the Galaxy Y or Young. The design and build quality of the Galaxy Pocket S5300 feels better than the Galaxy Y as it does have a more attractive finish on the back unlike the Galaxy Y. The phone is still only a lower end budget phone and cannot be considered as anything more than that due to its poor specifications but a price of about Rs. 8100 what more can you expect from it.


    The Operating System is still Android Gingerbread 2.3.5 but it should be modifiable soon as developers will soon make custom ROMs on the device that bring the ICS experience to the low end phone. The Camera is still the same 2 MP camera and does not have any change in the video quality from the Galaxy Y.


    The only significant difference between the Galaxy Y and the Galaxy Pocket is the 3GB internal memory on the Galaxy Pocket as compared to the 200 MB on the Galaxy Y. But the 3GB seems to come at a reasonable price as the price difference between the Galaxy Y and the Galaxy Pocket is about Rs. 1100.


    The design does have a significant variation which is the square home button on the Galaxy Y as opposed to the Rounded Edged Rectangular Button on the Pocket. The battery and other specifications such as the Network Capabilities are the same.


    The Galaxy Pocket also has a similar 820 MHz processor as the Galaxy Y. The Galaxy Pocket is a bit smaller in terms of its dimensions and also losses a fifth of its screen size as compared to the Galaxy Y.


    The Verdict:
    The Galaxy Pocket is a budget phone and definetly not the Android Enthusiast. But if you are just looking for a device to provide a decent Android Experience but for a low price then this is definetly the phone for you.


    Send Ayush Chand+ an email.

    Download Instagram 1.0.6 APK for Android

    0 comments

    Instagram is widely popular because it provides a wide array of effects or filters for your photos. And recently it was released for Android Users. The Instagram 1.0.6 brings support to Froyo users and also gets it working on the Samsung Galaxy Y.There have been a couple of updates on Instagram since the original 1.0.0 version. Now Instagram 1.0.6 is out and here is where you download the APK instead of installing it directly from Google Play. Earlier we did a similar post on download Instagram 1.0.5.


    Below is the official release from the people behind Instagram about the app.

    Instagram was launched in October 2010 by co-founders Kevin Systrom and Mike Krieger. Instagram is a fast, beautiful and fun way to share your life with friends through a series of pictures. Simply snap a photo, then choose a filter to transform the look and feel. Pictures are shared on Instagram, and can be easily uploaded to other social media platforms including Twitter, Facebook and Tumblr. 
    You can download the Instagram 1.0.6 APK For Android from the link. Alternatively you can get it from Google Play.


    To install you will need to have a phone that allows installation of apps from Unknown Sources. This is only because we are downloading the APK instead. To do so go into Settings then Applications then select Unknown Sources.

    This update doesn't bring any serious bug fixes. Probably the 1.0.7 will be released soon too.


    Send Ayush Chand+ an email.

    Install AOKP ICS 4.0.4 on Sony Xperia Play

    0 comments
    The Sony Xperia Play recently received the Ice Cream Sandwich(ICS) Beta Update a while ago but not many Custom ROMs have been released on it. The Beta ICS update is pretty buggy and still only recommended for developers. This AOKP ICS 4.0.4 ROM however is much better than that with only few bugs such as no ability  to support Video Recording. However the developers will probably find a fix to this bug soon so you do not have to worry about the minor glitches.


    According to the developers here is official list of what is working and what isn't on the AOKP ICS 4.0.4 ROM.


    What works:

    - Boot
    - Camera
    - Root
    - Orientation
    - Touchscreeen
    - Sound
    - Wi-Fi
    - USB Debug
    - GSM
    - GPS
    - Front Camera
    - Data
    - Gamepad
    - Bluetooth
    - USB Mass storage
    - Touchpads
    - Video playback
    - Panorama

    What does not work:

    - Video Recording


    Installing the ROM is quite simple and you can do it easily.

    1. First thing you need to do is make sure you have unlocked your Xperia Play. If you haven't then follow the instructions in this post to do so.
    2. Next you need to download the files necessary for the Custom ROM to be installed on your device. Do that from here.
    3. Copy this onto your phones SD Card and then switch OFF your device.
    4. Now just boot into recovery mode. Be sure to Wipe Data and Clear Cache just to prevent any errors. Now navigate to to .img file you downloaded onto your device and flash it. Just wait for the process to finish and that's it.
    Now you have successfully installed AOKP ICS 4.0.4 on the Xperia Play. If you have any doubts about the process feel free to comment.


    Send Ayush Chand+ an email.

    Copyright 2012 Unlimited Tips.